Mobile App
The mobile app runs on Android, Windows 10, Linux and Mac OS-X
Via DOWNLOADS use the adu_client_android or inside the procmt_experimental_64bit.
Note
Note that for means of power saving the ADU-08e / ADU-08e-2C will deactivate the WiFi after 15 minutes if no device has been connected. You can reactivate WiFi with help of the power button or front panel
Caution
When you reboot the system also completely close the app, really close! in order to enforce that the ADU configuration is re-read completely
when re-connecting.
Caution
There are some Restrictions_in_Programming and on the ADU-07e some additional Limitations_ADU-07e
New May 2020
Grid raster 64s for RR, 60s for AMT/MT with virtual sample rates down to 4s only, 1s raster for arbitrary start times
Load previously stored joblist from the ADU and run them. The enables you to use your personal style or containing subjobs.
First make the E-field spacing, site settings (in case), press write in order to make changes persistent
BEFORE loading the list change the start time, load the list and … off you go
Short video intro
(click video to full screen)
Programming a Job
(click video to full screen)
Several pre-programmed job list are available. The name indicates which frequencies will be used, and their duration. This is the easiest way to record MT data.
Finalize a Job
(click video to full screen)
The pre-programmed job list will run for 10 days.
Coming back to the station you stop the recording and while downloading you submit the high frequency jobs (only) again.
Special Jobs
(click video to full screen)
Eject the SD card on ADU-08e, format SD card, copy to USB device
Connecting to the ADU-08e System
|
Information If you want to connect from a mobile device via WiFi, |

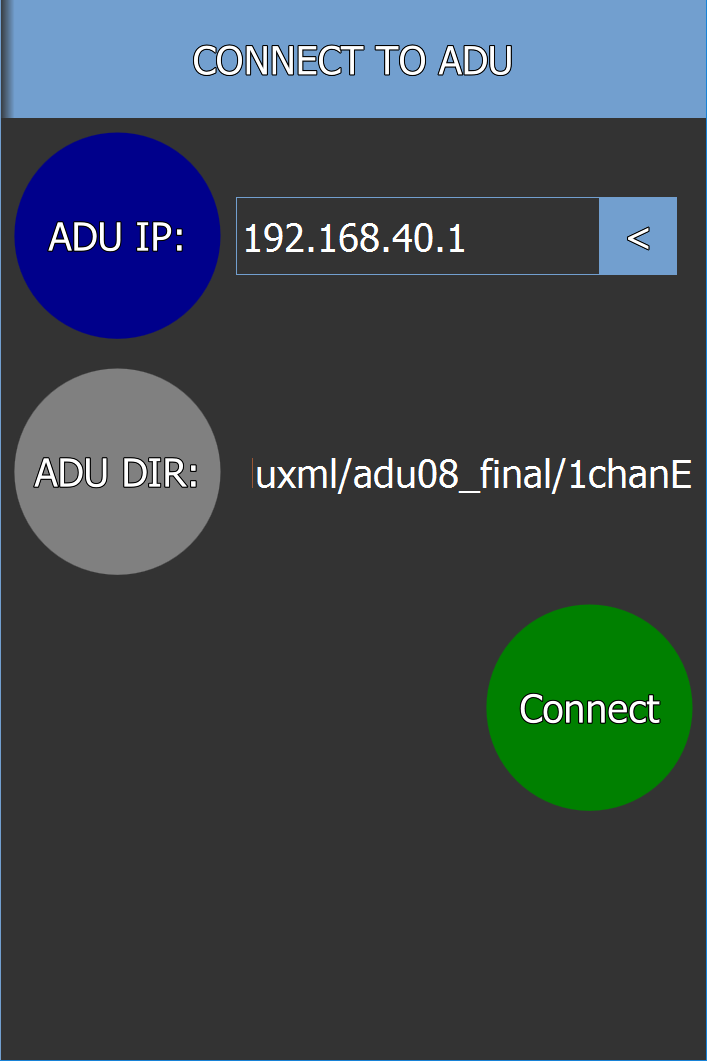
After having started the App, it is not connected to the ADU-08e system yet.
Click on the „CON” button to open the „Connect To ADU” tab. On that tab enter the target IP address of the ADU-08e system inside the „ADU IP” box and click on the „Connect” button.
Now, the App is connected to the ADU-08e system and the main tab shows the actual status of the ADU-08e.
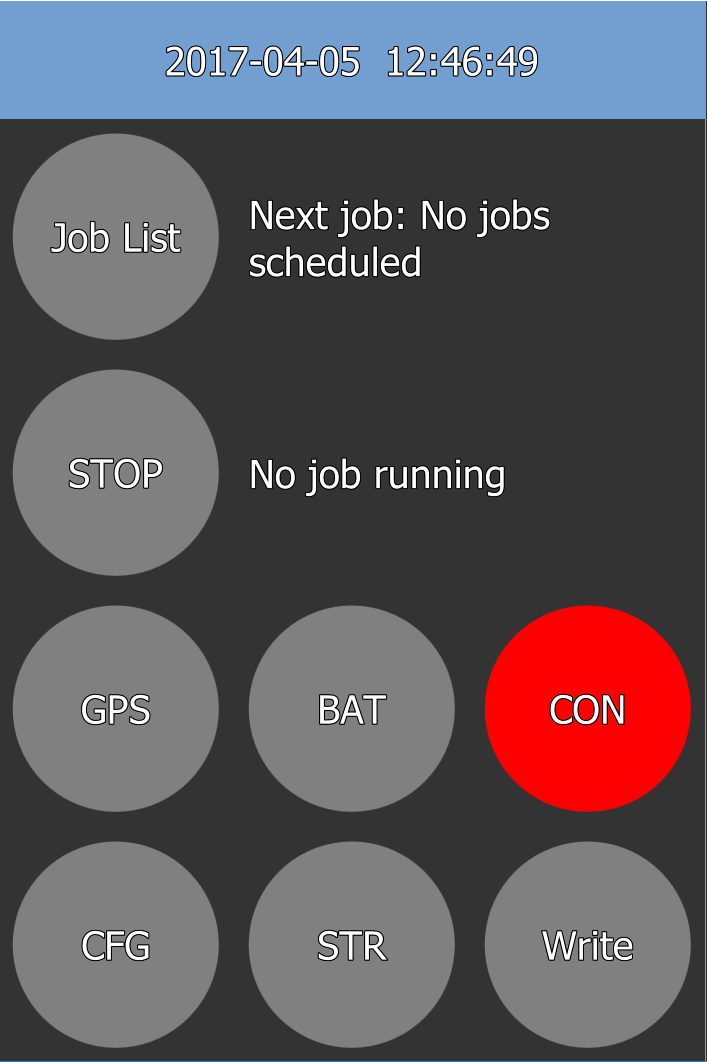
Main Tab
Once you are connected to the ADU-08e you should check the actual status of the ADU-08e system. For this purpose the „Main Tab” contains the following information:
Date/Time: Shows the actual Date/Time of the ADU-08e system - e.g. UTC

Time To Next Job
This element shows the remaining time until the start of the next job or idle.
|
No jobs are scheduled; system idle |
|
Shows “starttime of next job”. |


Additionally, clicking on this button will open the “job list” tab
Current running job
|
No jobs are running; system is idle |
|
A job is running at 65536Hz. |


Additionally, clicking on this button will open the “stop job” tab ref: Stopping Jobs
GPS Status
This element shows the current status of the synchronization to GPS of the ADU-08e system.
|
The ADU-08e system is fully synchronized to GPS |
|
GPS has Full Sync, but ADU-08e system is not yet synced to GPS time |
|
The ADU-08e system is NOT fully synced to GPS time |


Additionally, clicking on this button will open the “GPS” tab “GPS Status”
Battery Status
This element shows the current battery status.
|
Battery is “GOOD” and fully charged |
|
Battery is “FAIR” |
|
Battery is “LOW” |


Additionally, clicking on this button will open the “Battery” tab
Self Test Status
This element shows the self-test results status.
|
Self-test Result is “OK” |
|
Self-test Result is “Warning” |
|
Self-test Result is “Critical” |


Additionally, clicking on this button will open the “Self-test Results” tab
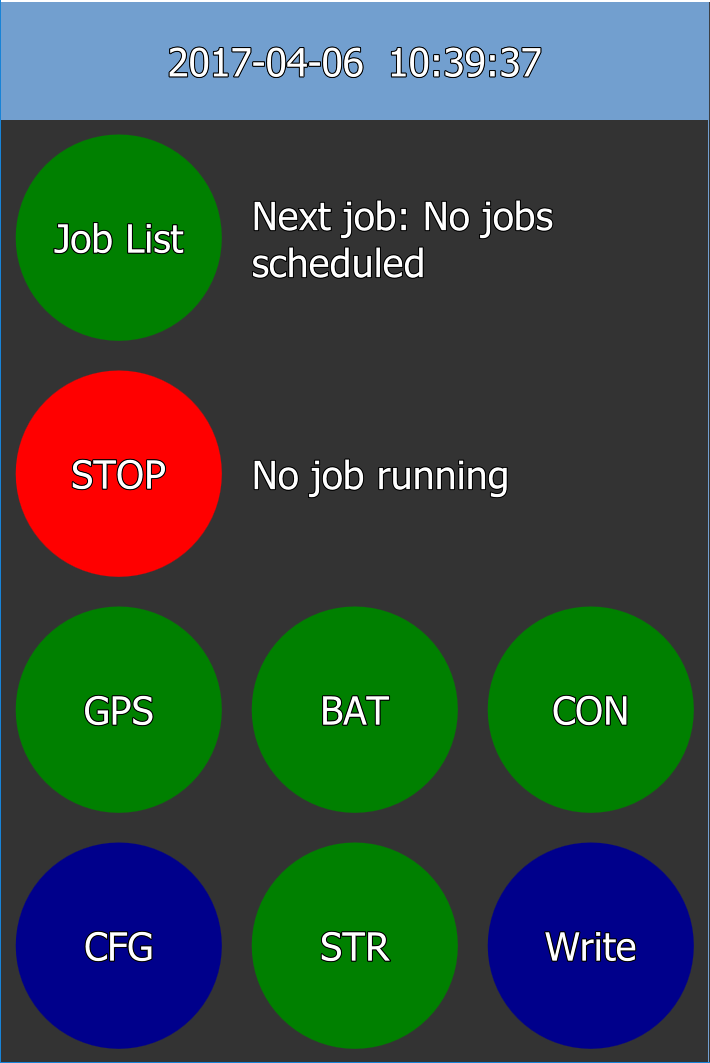
Status Buttons
If, after the Self-test has finished, the Status buttons show the following colors:
|
|
|
All Status Buttons show Green |
|
|
|
GPS Status is yellow, but all other status buttons show green |
|
|
|
GPS Status is yellow or red, but all other status buttons show green |
|
|
|
Battery status is yellow, but all other status buttons show green |
|
|
|
Battery Status is red, but all other status buttons show Green |
|
|
|
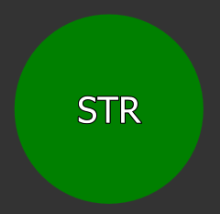
Self-test result is yellow, but all other status buttons show green |
|
|
|
Self-test result is red, but all other status buttons show green |
When STR is red additionally make a database dump via the WEB interface, zip, and send to in case you can’t solve the problem.
|
Caution |

|
Caution |
Configuration
|
Opens the configuration dialog |

Setting up E-Field Spacing
The E-Filed will be configured on the “Configuration” Tab. It is reached by clicking on the “CFG” button on the “Main Tab”.
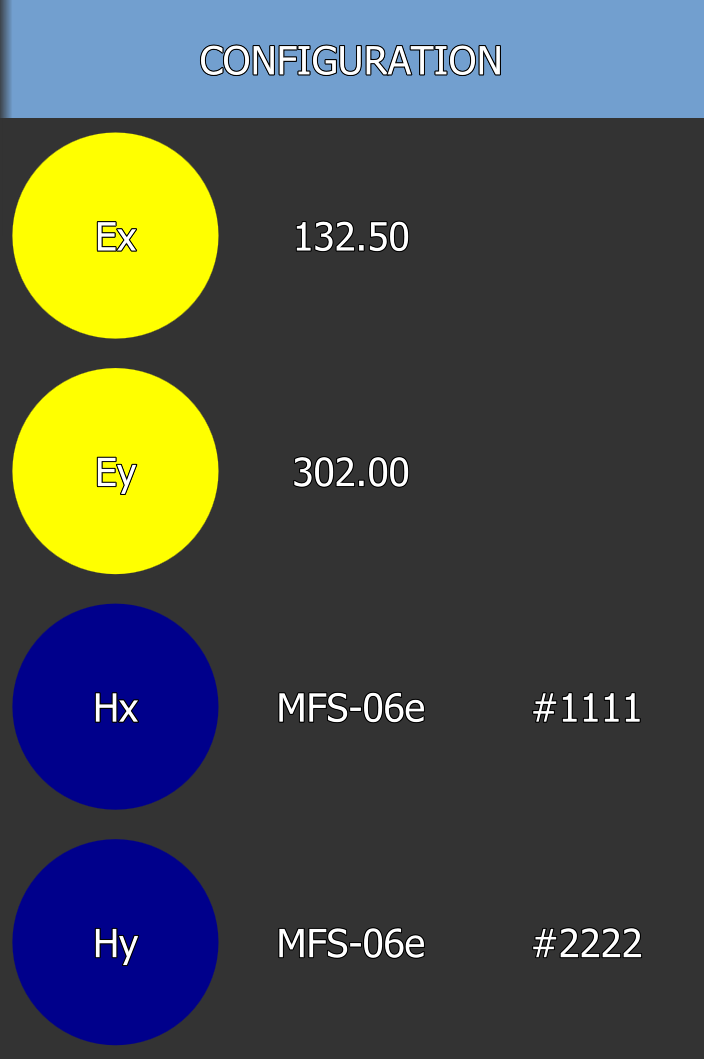
This tab shows the currently used E-Field spacing (along with the currently configured H-Field Sensors - Type and Serial).
Clicking on the single buttons will execute the following actions:
|
Shows the E-field spacing for Ex in meters (North-South dipole) |
|
Shows the E-field spacing for Ey in meters (East-West dipole) |
|
Shows the Sensor Type and Serial for Hx |


… same for Hy and Hz, when buttons pressed you go to Configure H Field
To configure the E-Field spacing for channels Ex or Ey, click on the according buttons to open the “Ex/Ey Channel” Tab:
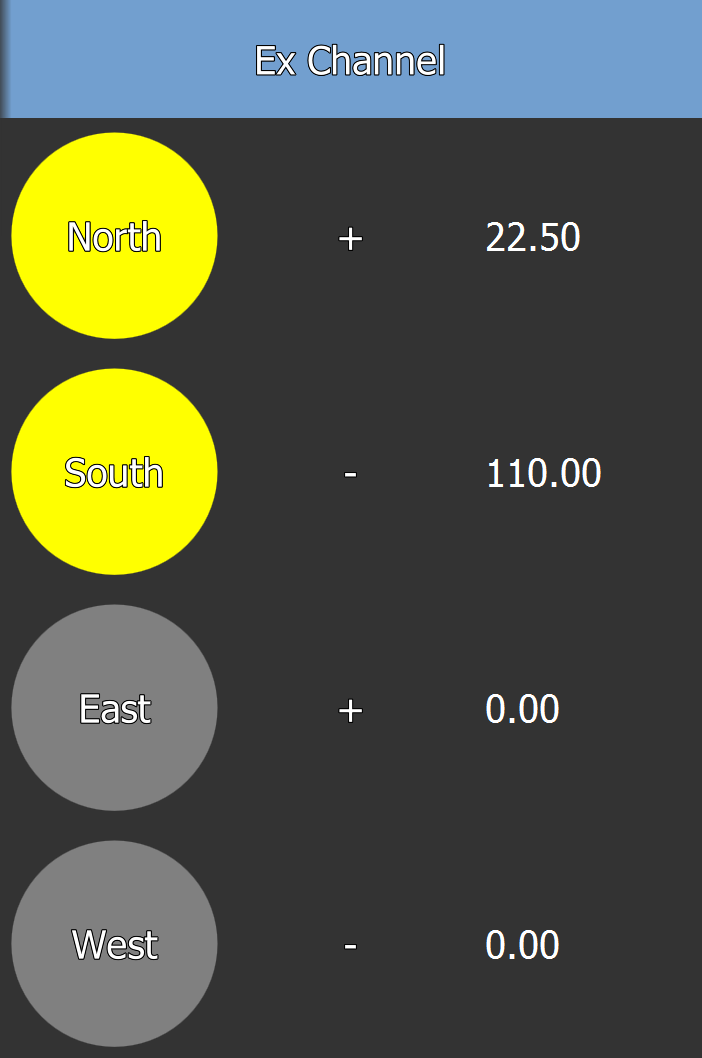
The single input elements can be used to configure the dipole length (North-South for Ex and East-West for Ey)
|
Caution |
Configure H-Field Sensors
The H-Field sensor types are configured on the “Hx”, “Hy” and “Hz” Channel configuration Tabs. They are entered from the Config Button
The coil type and serial number shown are the values from the auto detection.

|
Information |
In case you do not use series E-Type sensors you need to enter the sensor type and serial number manually. If you have a E-Type sensor connect and you do not have sensor type and serial number shown, something is defective and your recording may fail! This is done as follows:
|
Click on “Manual” Button and enter Serial Number |
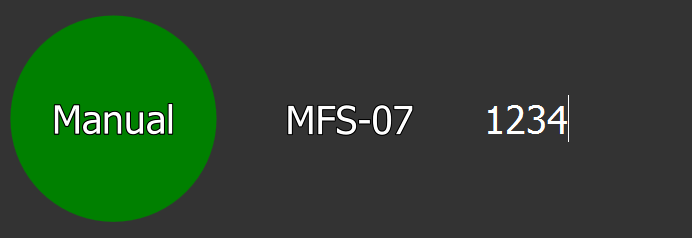
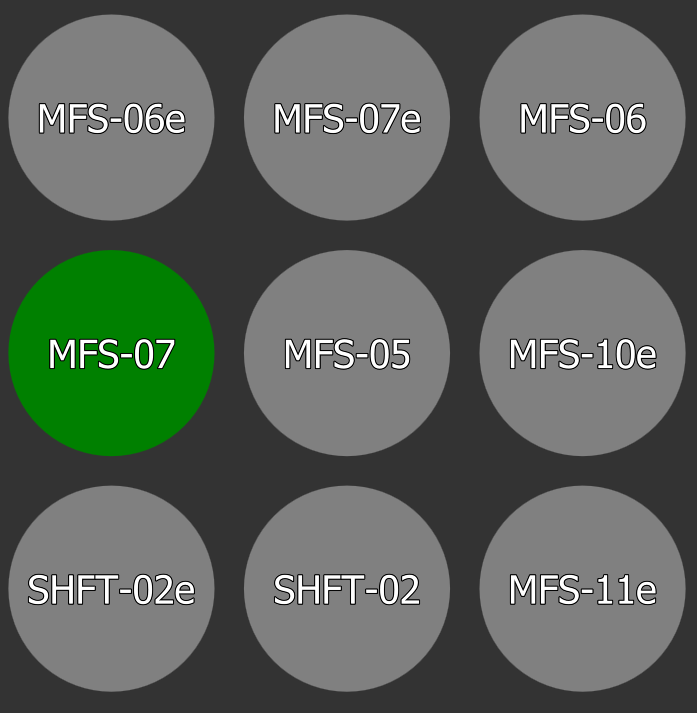
Select the sensortype that is currently connected
|
Caution! |
Clicking on the “AUTO” button will configure the sensor type and serial values back to the ones that have been read from the connected Sensors during boot-up of the ADU-08e system again.
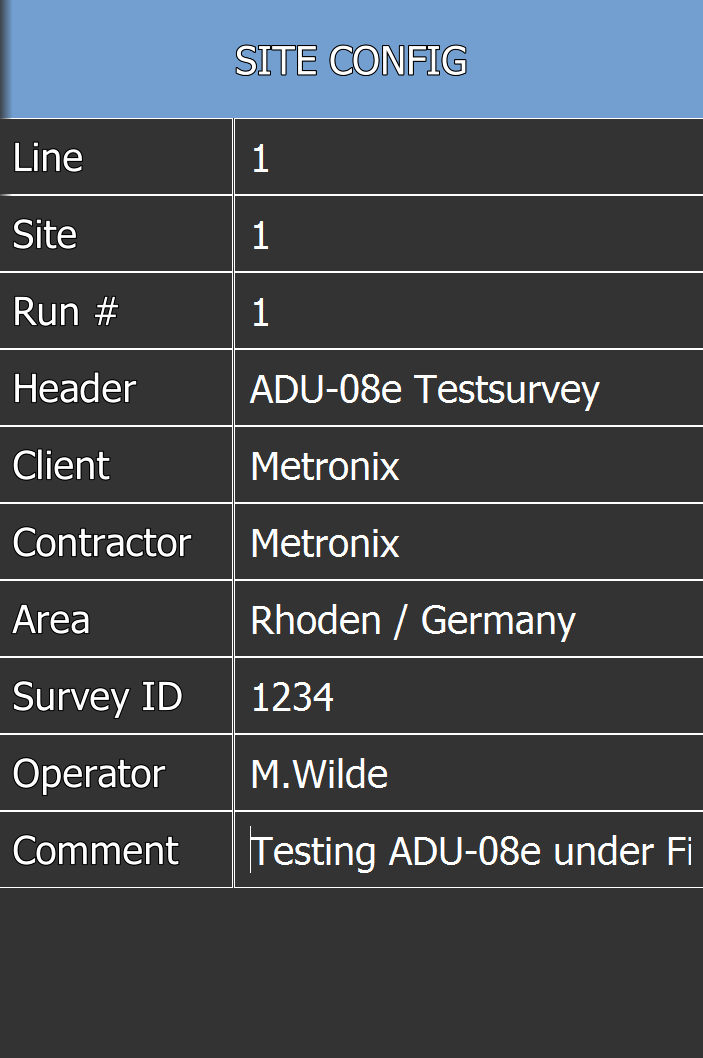
Setting up Site Config
The “Site Config” Tab is used to enter site specific information that will be stored along with the measurement data inside the “meas-doc” XML file and the ATS files. You reach it from the main menu by pressing CFG and then SiteCFG at the bottom.
|
Information |
Nevertheless, it may help later on to find / identify the data or trace down data quality problems. It is also required for ISO 900X complient certified institutes.
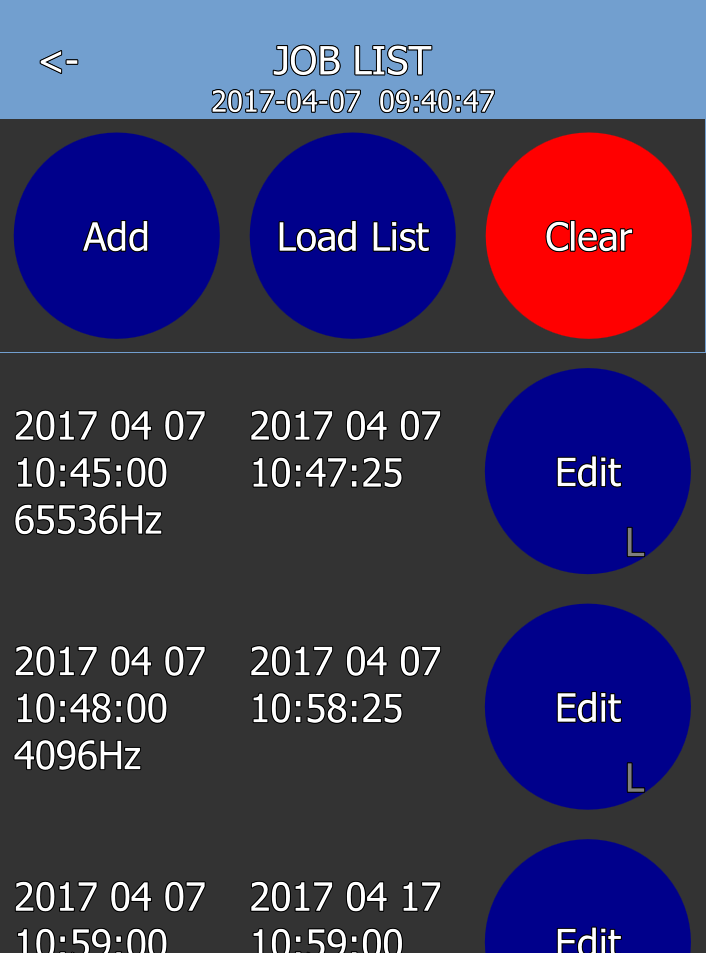
Start of a Single Job
A single job can be started from the “Job List” Tab. It is opened by clicking on the “Job List” button on the main tab.
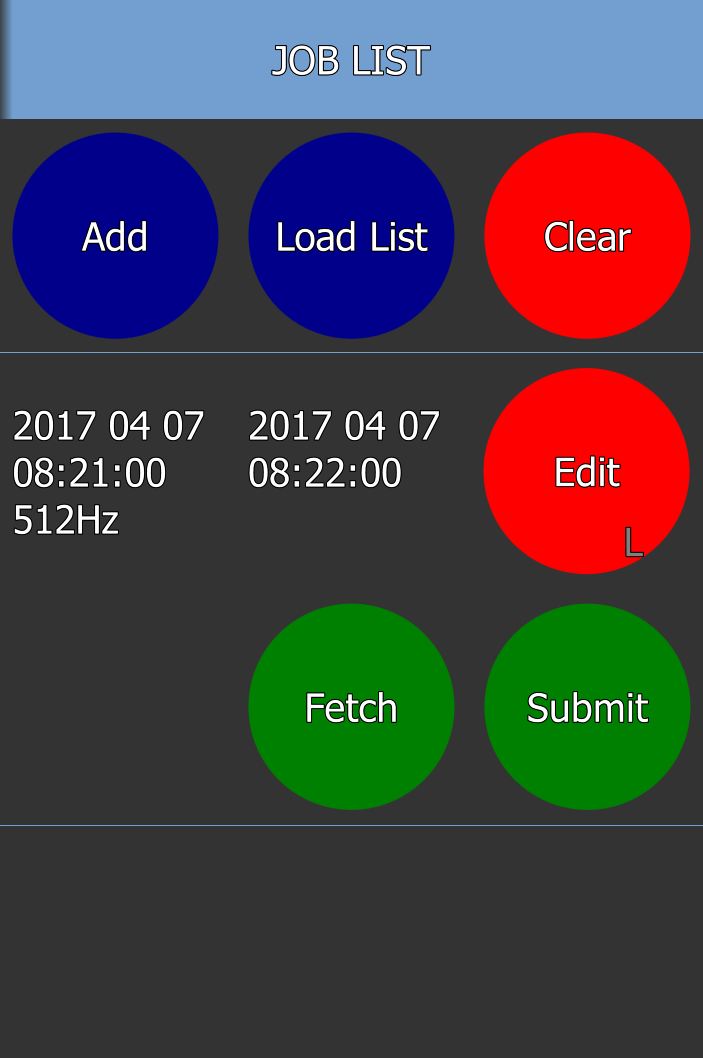
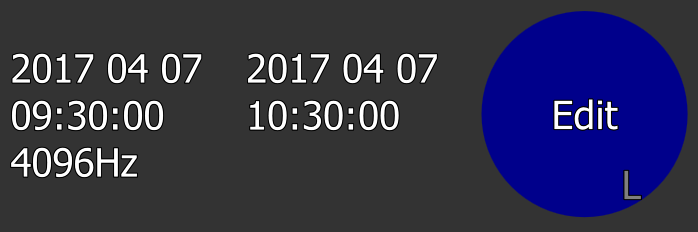
By default no jobs are scheduled on the ADU-08e system (indicated by “L” - List on “Edit” Button of the jobs L : on local phone/computer, ADU : on the ADU).
A single Job can be started by:
|
Clicking on the “Add” Button |
|
Clicking on the “Edit” Button of the job itself |


If clicked on the “Edit” button you may enter the Jobs parameters on the “Edit Job” Tab:
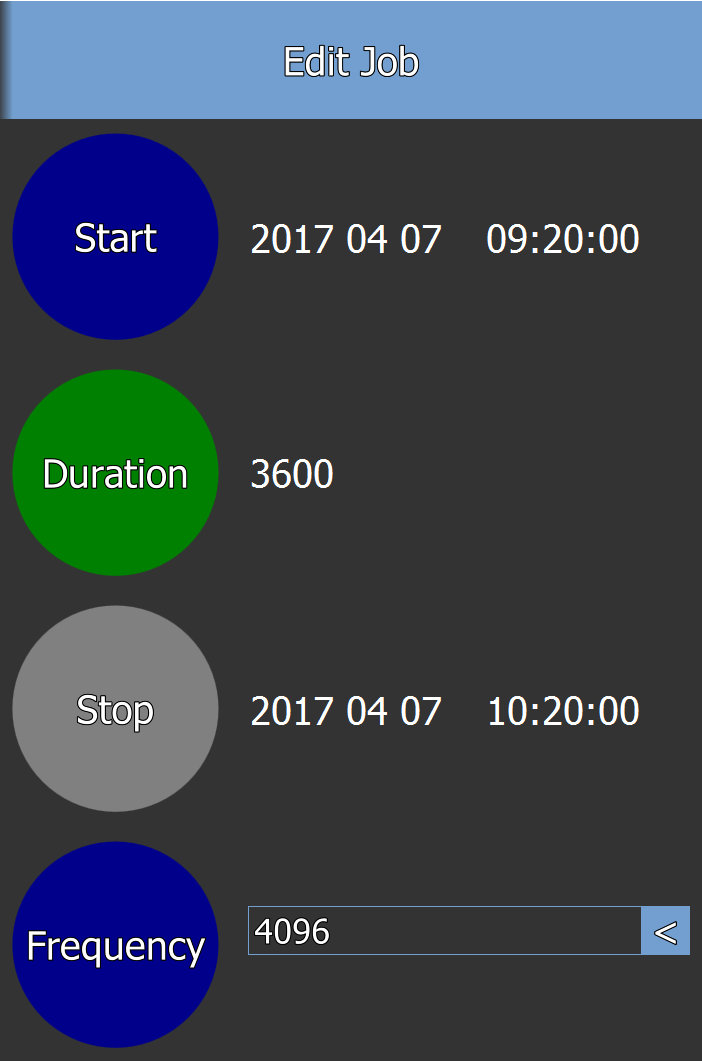

The single input elements are used as follows:
|
Enter Start/Time of the Job |
|
Enter Duration (Length) of the job in seconds. |
|
As an alternative, enter Stop Date/Time of the Job. |
|
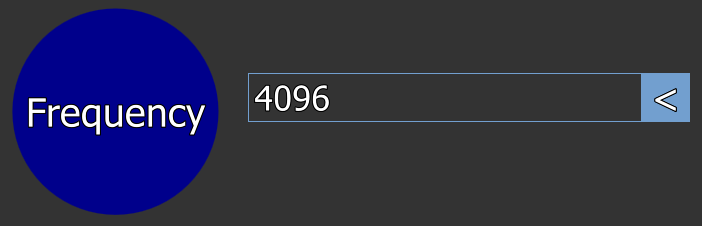
Enter Sample Frequency of Job |


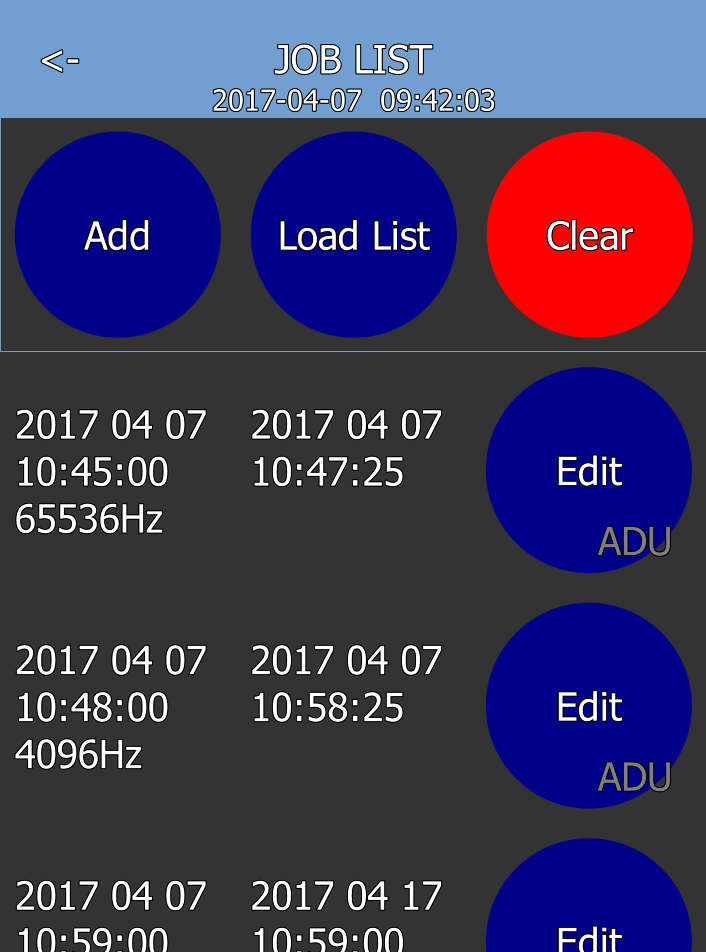
Finally, the changes need to be saved by clicking on the “Save” button. By clicking the Save button you will automatically get back to the “Job List” tab. Still the job is not yet submitted to the ADU-08e system:
|
Job was edited, but is still not scheduled on ADU-08e (see “L” on “Edit” Button). |
|
Clicking on the “Submit” button will transmit the Job to the ADU-08e |
|
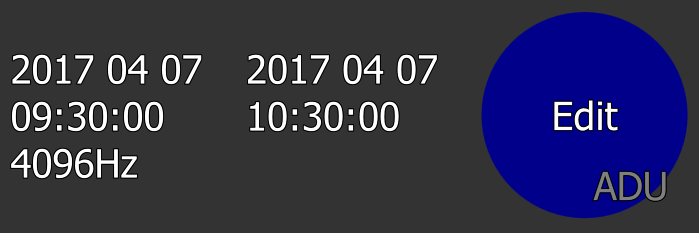
Now, the job is scheduled on the ADU-08e system (see “ADU” on “Edit” button) |

The other buttons execute the following actions:
Starting a Complete Job-list
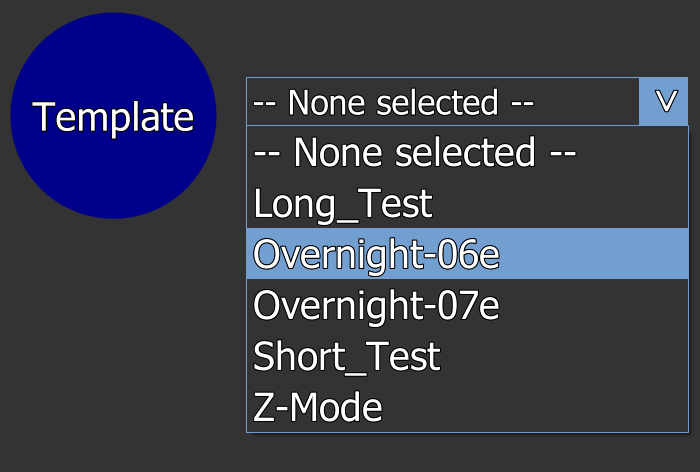
Clicking on the “Load List” button on the “Job List” Tab will open the “Load Job List” Tab that can be used to start a complete, already pre-defined job-list:
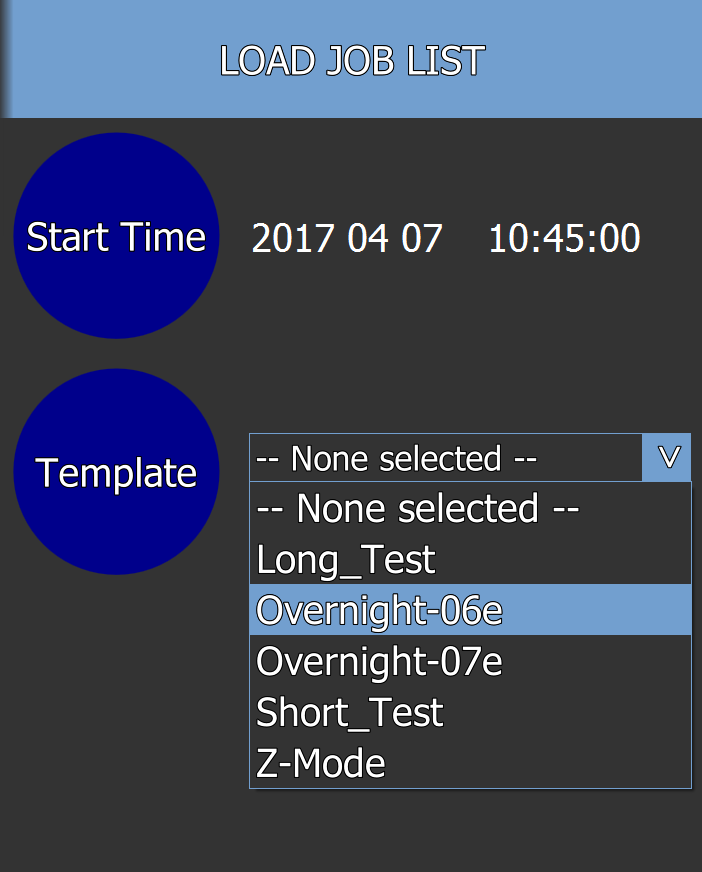
You just need to do the following:
|
Enter Start Date/Time of the job-list |
|
Select the job-list to be started |

After having selected the job-list to be started you will automatically get back on the “Job List” Tab with all the jobs of the selected jobs being listed:
Again, the jobs are not scheduled on the ADU-08e system yet. To transmit the job-list to the ADU-08e system you need to click on the “Submit” button on the bottom of this tab.
Afterwards the jobs of the job-list are transferred to the ADU-08e system and will be started once the start-times are reached:
The single Job-list Templates consist of the following Jobs:
Name |
Use Case |
Long Test |
Used for long test run on a new site |
Overnight-06e |
Full recording schedule to acquire data in ALL frequency bands, using MFS-06e sensors |
Overnight-07e |
Full recording schedule to acquire data in ALL frequency bands, using MFS-07e sensors |
Short Test |
Short Site test |
Direct-Mode |
Short test job-list for direct ADC input w/o preamps |
In most job lists the last job is the LF job. You may want to edit the last job and adjust the duration to your needs.
Stopping Jobs
The “Stop Jobs” tab shows information about the jobs currently running:
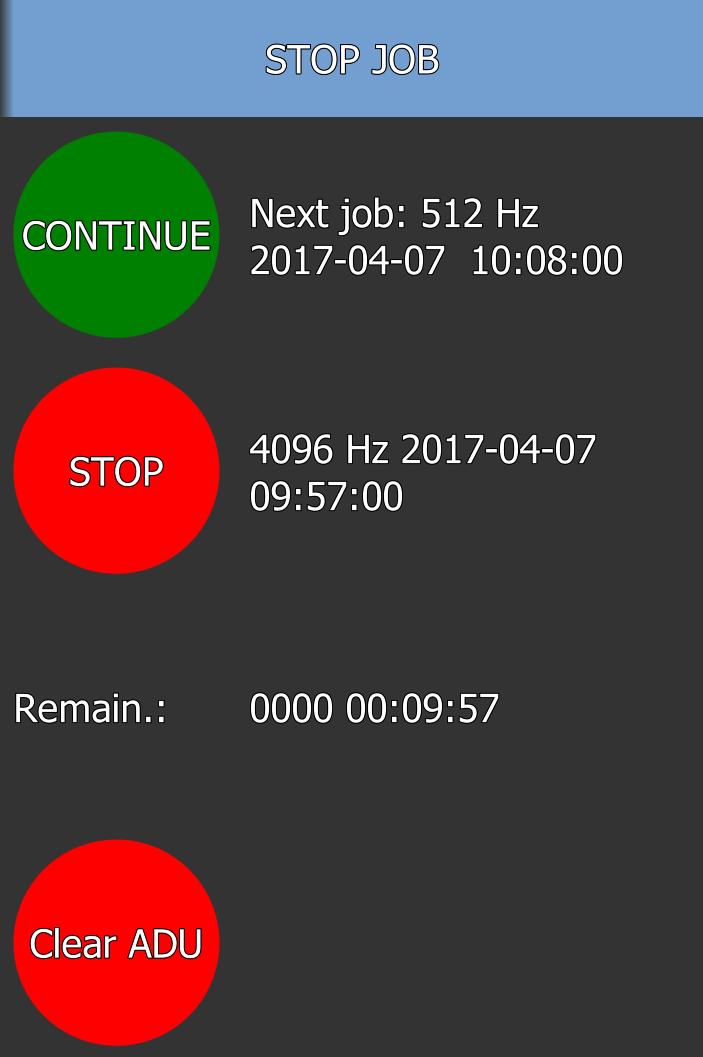
The single elements have the following functionality:
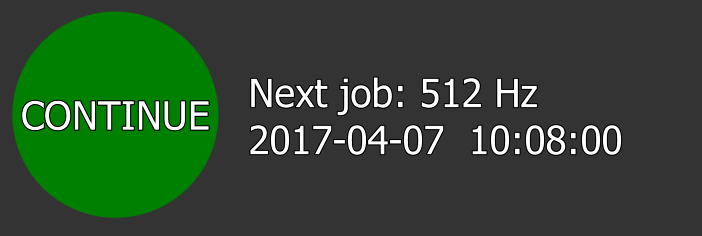
|
Shows the start-time of the next scheduled job on the ADU-08e system |
|
Shows information about the job currently running |
|
Shows the remaining time of the currently active job in |
|
Clicking on this button will remove all scheduled jobs from the ADU-08e system |


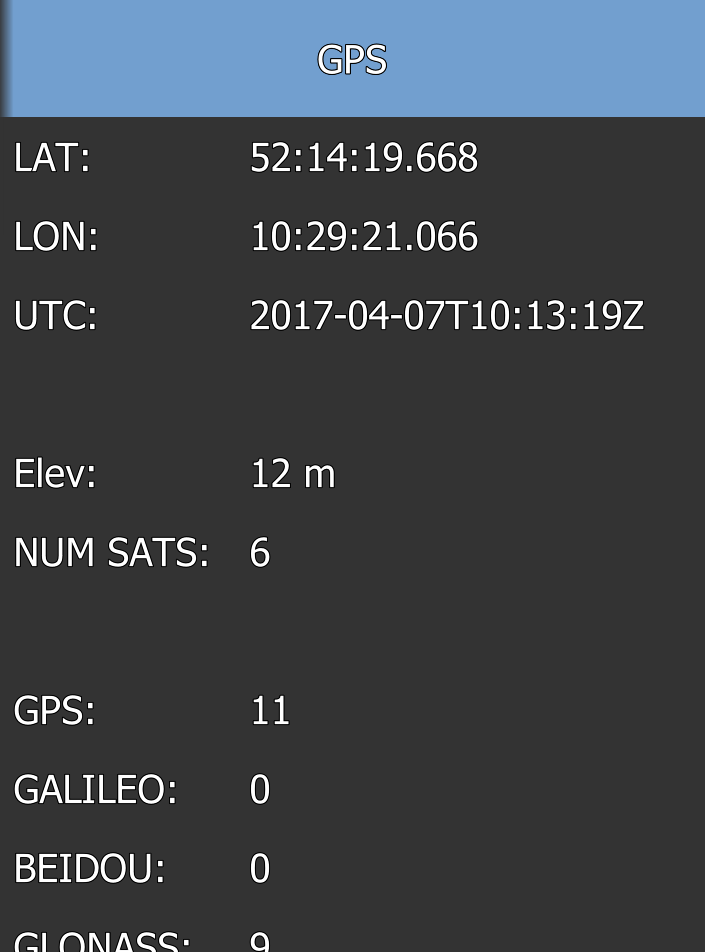
Checking GPS Status
On the “GPS” Tab you may check the current status of the GPS:
|
Note that the number of satellites reported for the single GNS (such as GPS, Galileo and Glonass) |
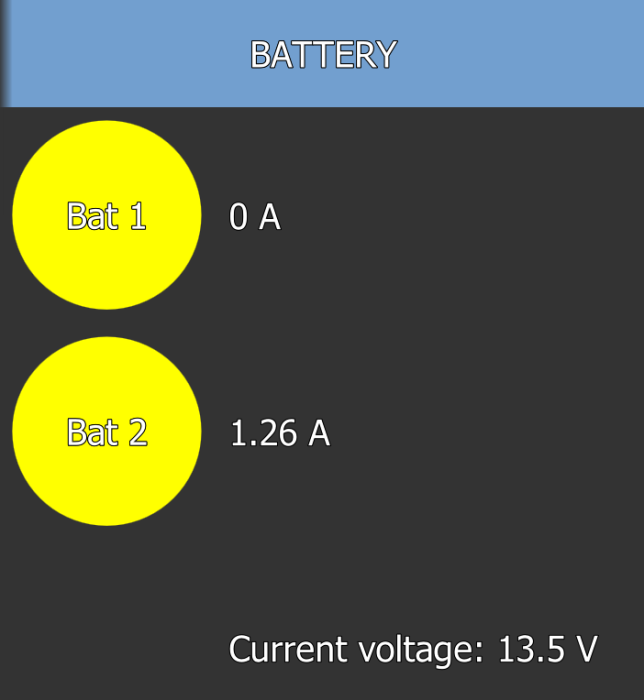
Checking the Battery Status
On the “Battery” Tab you may check the detailed battery status for battery voltage and Battery Current that is currently drawn from battery inputs BATT-1 and BATT-2:
|
Information |
Hence that the drop down in voltage is not linear! If the voltage drops down from 13.5V to 12.5V in 6 hours, another 6 hours later the Voltage is maybe 10V only (so lees two instead of less one in the same time).
Checking Self-Test Results
On this tab you may check the detailed self-test results for each one of the channels:
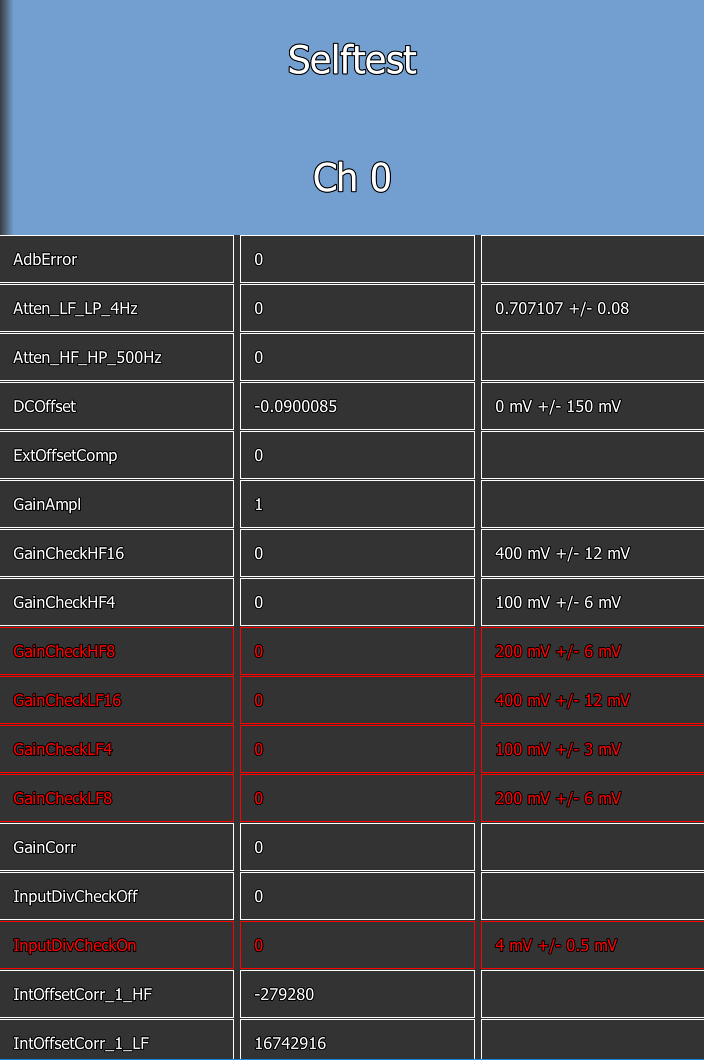
For each channel the results and the according limit values are shown. Values that are out of range are marked in red color
|
Information |
Format SD Card with ext4
The ext4 file system is the Linux native file system. It is more reliable compared to the stone age FAT32 and vFat.
We recommend always to use ext4 together with the SD card or external USB drives (except for short runs).
(You do not need to press EJ-SD card - this is done automatically)!
The maximum size for the internal card is 32 GB.
Go to CFG -> CLR-SD; make sure that is moment your are NOT connected via samba and access the ADU’s network drive.
Insert and Eject SD card
You can eject and insert the SD card without powering off the ADU.
This can be desirable when downloading huge data sets or for CSAMT where you have one card for each station with.
A joblist can be put in advance on the card and the ADU starts to run after booting.
Restrictions
The App is made for simple and safe programming of the system for 3/4 of all cases.
You can not select boards or chopper manually, program cyclic or subjobs.
Also the App strongly relies on a “freshly” booted ADU with sensors auto-detected and selftest carried out.
The user may edit the E-Field spacing and site configuration, load a joblist and safely record his MT site.
After detect sensors (which may takes about 10s in the background) please disconnect & connect the app again; the hardware configuration is only read during login.
(I have not programmed a “reload” button).
The hardware configuration is the REAL detected configuration; not the channel configuration - which is your self-made configuration. The App relies on the e-series sensors and
reads the hwconfig only. Temporarily you can change the sensors and press “Write” - to keep alive your configuration until next boot. It contradicts with the philosophy of
the App to use non-detected configurations.
Limitations on ADU-07e
The App is written for the ADU-08e; we have writen some wrappers to make the App functioning with the ADU-07e.
The ADU-07e uses eventually the big “IN2” to connector.
In this case the Apps maps the IN2 magnetic channels down to the standard connectors.
A dual sensor setup (coils and fluxgate/SHFT) at the same time can not be operated by the App.